In this article, we will go through the steps for creating a simple Linux server in Amazon Web Cloud service
We have seen in the previous article<link> on how to create an Amazon Web Service account (free tier for 1 year). Using that account we are going to march on to the next step, which is to create a simple Linux server
EC2 Instance creation steps:
Step 1: Login to the Amazon console, using username/password created in the previous article
From the services Menu, select Compute -> EC2 Submenu

Step 2: Once EC2 dashboard is displayed, you will find an empty table listing zero EC2 instances
Click on ‘Launch Instance’ button

Step 3: This page displays a list of OS. For now, we are going to select ‘Red Hat Enterprise Linux 7.1(HVM). SSD Volume Type’
Press Select button for the highlighted option below

Step 4: The next page displays a list of instance types for Red Hat Linux (different capacity, memory, computing speed etc). For now, we will select the free tier instance (i.e. t2 micro ) since its freely available (of course with certain limits) and is enough for general purpose use
Press “Next: Configure Instance Details”

Step5: The Next page displays all the configuration setting related to instance

Set : Number of Instances =1 ( you may create more than 1 instances simultaneously )
Purchasing Option = unchecked (Spot instances are not freely available and will cost you as per the charges of the instance type)
Network = default VPC for the Region
Subnet = Default Subnet in any availability zone

Every region has multiple availability zones in it. You may choose any availability zone from the list.
For now, we are going to select the default one.
Auto-assign Public IP = Use Subnet Setting (Enabled) – This will ensure a public IP address is assigned to your server
IAM Role = None
Shutdown behavior = Stop
Enable Termination Protection =unchecked
Monitoring = unchecked
Tenancy = Shared Tenancy
Press “Next: Storage”
Step 6: This page will give you the option to add additional Storage disks to the server apart from the boot disk. Every OS will have a minimum storage requirement that is required for the system. In our case (OS = Red Hat Linux) the minimum boot disk size is 10 GB
You may increase the size of the Root disk to any value above 10 GB
You may also add additional disk of any size.
Press ”Next: Tag Instance”

Step 7: In the next page you can add tags (optional) to the server. These tags are used to identify the purpose of the server. Tags can be anything like, Name, Environment, Role of the server etc.
Click on “Next: Configure Security Group”

Step 8: The Security group is a firewall that allows/denies communication (both inbound and outbound) with the server. You can either select an existing Security Group OR create a new Security group

For now, we are going to allow communication only through tcp on port 22
And then Click on “Review and Launch” button

Step 9: This will take you to review and Launch page


Press the “Launch” button
Step 10: Before launching the server, you will be asked to create/or use existing a key-pair

Since this is our first server, we will create a new key-pair for it

Give a name to the key pair and download the key pair
And then finally click on “Launch Instance”

This key pair will be used in the next blog, when we shall see how to connect to this Linux server
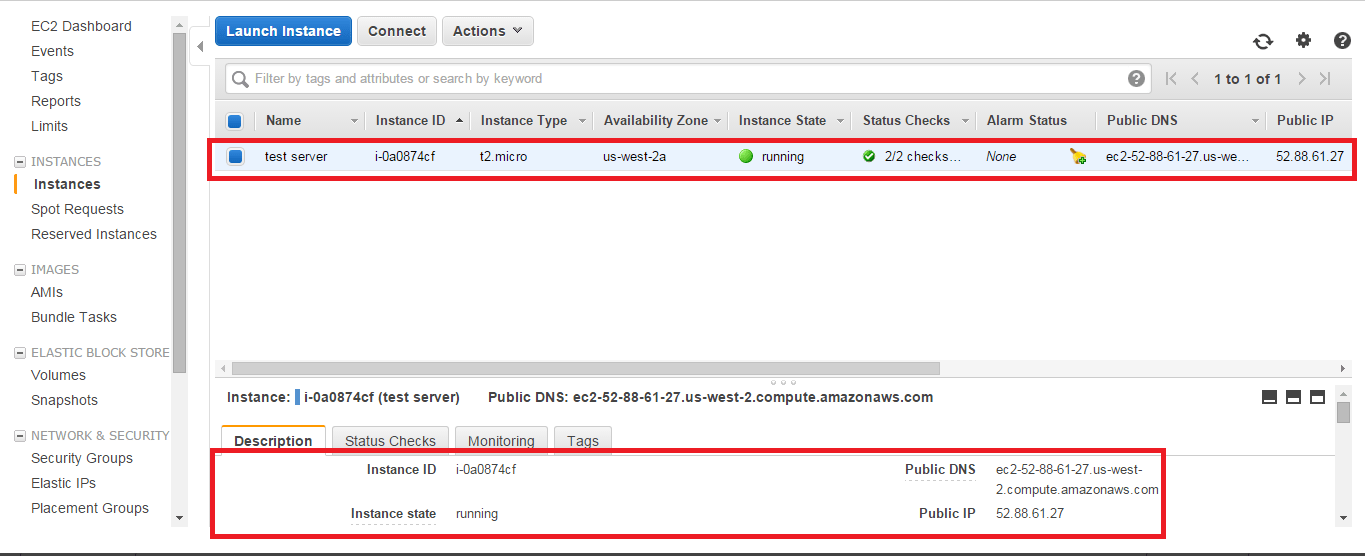
Step 11: The dashboard will display the newly created server. Also check the Instance State. It is ‘pending’ which means that the server is starting up

Once the server startup is complete, the Instance State will change to ‘Running’ and the Status check will show ‘2/2 checks complete’
In the upcoming article, we will use this instance and key-pair created to connect Linux instance using putty
Happy Reading !!
Happy Learning !!