In this article, we will explore the use of FTP Transport node in OSB 12c for file polling/reading and writing to remote server or FTP server machine
1. Business case requirement :
- Read or poll files periodically from remote server or FTP server machine and write to same or another remote server or FTP server machine (we will use local FTP server for demo propose)
- Need to authenticate local FTP server for file polling/reading or writing
2. Assumptions :
- All file reading/polling and writing are in the same remote server or FTP server machine
- We will create static Service Account passing username & password and later this will be used in the both Business Service and Proxy Service for authentication
Let’s get started with designing OSB module for File Polling/Reading and Writing using FTP Transport example in Oracle JDeveloper 12c IDE
3. File Polling/Reading & Writing using File Transport :
Step 1: Open New Project
File Menu –> New –> Project

Step 2: Select Service Bus Tier from available categories
Service Bus Tier –> Service Bus Project –> OK
This opens up wizard for New Service Bus Project

Note: Comparing this wizard with the one we have created in this article, the major difference is “Service Bus Project” option is enabled since we have one Service Bus Application in the user/developer workspace (already created)
Step 3: Enter Project Name and its directory location for the new Service Bus Project
Leave the default values for demo; otherwise we can give more specific names in accordance with naming convention followed in the project
Project Name: FilePollReadAndWriteUsingFtpTransportSB
Click Finish

New Service Bus project will be created with required artifacts
Step 4: Create required folders in accordance with project standards (naming conventions)
Generally, there should be
- ProxyService folder to place/store/save the proxy services which ends with .proxy
- BusinessService folder to place/store/save the business services which ends with .bix
- Resources folder to store all other required artifacts like WSDL, Schema and transformations files
In this example, we will create Service Account called FtpUserCredentialSA.sa with resource type static (passing username & password) under Resources folder
Now, we will create above listed folders
Right click on the Service Bus project –> New –> Folder…
Opens up a new wizard

Note: If you don’t find “folder” option directly, then click on “From Gallery” and from there choose folder option and continue with below steps
Create Folder wizard –> enter folder name like, for example “BusinessService” for Business Services
Finally click OK –> to create folder

Similarly, we can create “ProxyService” and “Resources” folder
After creating three folders namely ProxyService, BusinessService and Resources; our project will look like below screenshot

Step 5: Create Service Account for local FTP server authentication
Right click on the Resources folder –> New –> Service Account…
Opens up a new wizard
Note: Not necessary to create Service Account in this location only, but to follow certain rules/policy in accordance project standard –> which will help in readability and understanding better in future
Also, we are creating Service Account ahead of Business Service & Proxy Service –> reason being this need to be used while configuring both BS & PS for local FTP server authentication

Step 5.a: Provide Name to new Service Account that’s going to be created for local FTP server authentication, which will be used in both
- Proxy Service for FTP file polling/reading
- Business Service for FTP file writing
3.1 Service Account :
- Name: FtpUserCredentialSA
- Location: browse through “Resources” folder we created in earlier step
- Description: provide some meaningful description for Service Account created like shown in the below screen capture
Note: Don’t write username/password combo as shown (this is just for demo purpose)

Step 5.b: Provide actual FTP server user credential value in FtpUserCredentialSA.sa file
- Description: write some meaningful description as explained in above step 5.a
- Resource Type: static (for this example)
- Static User Configuration: that is provide username and password for local FTP server
Note: It’s a choice to use any of the three Resource Type available, but for this example we will stick with Static for simplicity

3.2 FileZilla FTP server :
For setting up and hosting local FTP server using Filezilla free software refer here
3.3 FileZilla FTP client :
To test above hosted FileZilla FTP server, refer this article for FileZilla FTP client
3.4 Business Service :
Step 6: Create Business Service for file writing
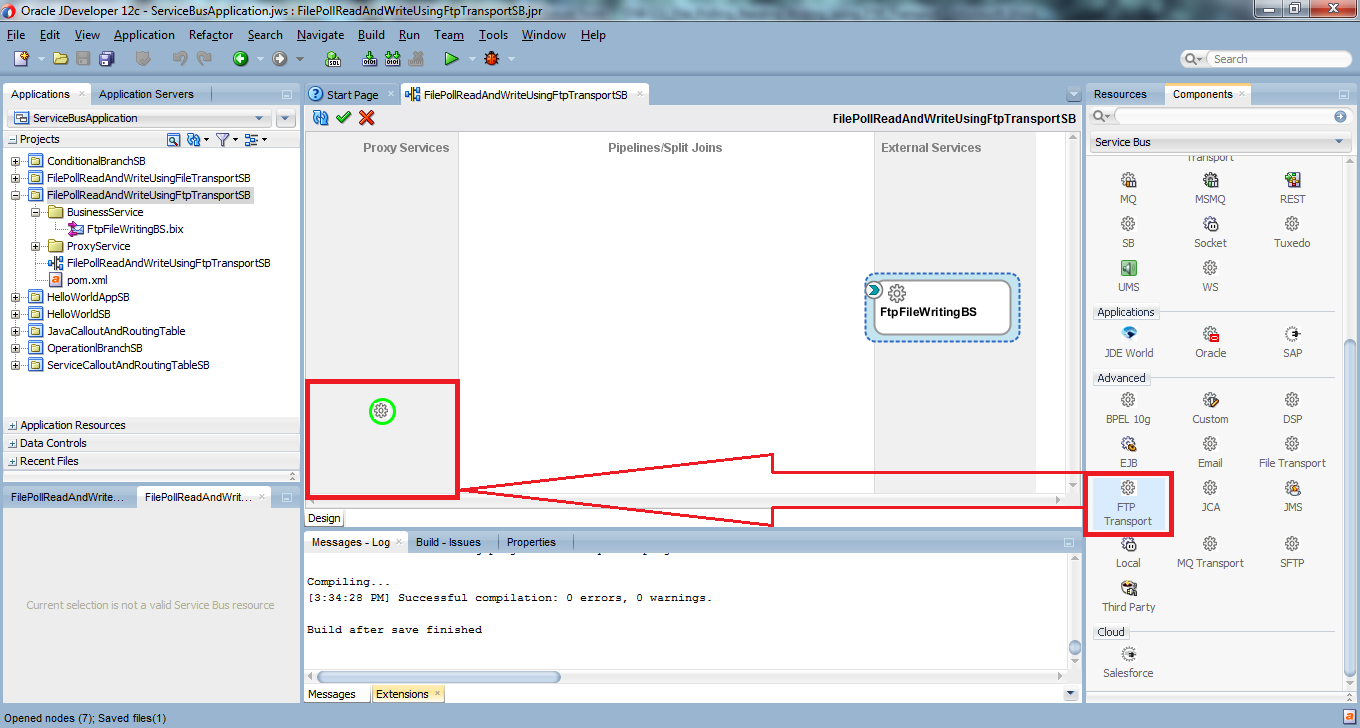
Drag and drop “FTP Transport” component from Technology palate under advanced category to External Services lane (Business Service in 11g)

Upon dropping, a new wizard pop up to enter the required details for Business Service or External Service
Step 6.a: Fill up mandatory details for Business Service (i.e .bix file)
- Service Name: FtpFileWritingBS (append BS to the business service as a naming standard)
- Location: browse through “BusinessService” folder we created in earlier step
- Transport: ftp (keep it as it is)
Note: There are no other options available under Transport drop-down other than FTP Transport (ftp protocol)
Click Next

Step 6.b: In step 2 of Create Business Service wizard –> set “Request” & “Response” Messaging type for the FTP file Writing service
Select Text for Request Messaging type and None for Response Messaging type
Click Next

Note: The response message type must be None because the FTP transport supports only one-way messaging
Step 6.c: In step 3 of Create Business Service wizard –> set Endpoint URI to FTP file server location –> where we target to write files
In this example, “ftp://localhost:21/FtpWriteServerLocation” but it can be any valid FTP server location for FTP Transport
Click Finish

Finally, FTP Transport Business Service is created at the External Services lane

Step 7.a: Optionally, set FTP Transport Protocol details –> Save all
This is useful to set prefix and suffix of the filename that is going to be created. Still, we don’t have full control over the filename because it will auto generate a name with random logic and sandwich between prefix & suffix we supplied in the Transport Details tab
Double-click on “FtpFileWritingBS” from Service Bus overview or else open “FtpFileWritingBS.bix” file under BusinessService folder
Go to “Transport Details” tab –> Set “Prefix” and “Suffix”
Prefix: DataFile_
Suffix: .txt

Step 7.b: Set Service Account for FTP server User Authentication in Business Service
Since, Business Service write to FTP server –> it need to authenticate itself with FTP server before actual writing take place
Set User Authentication details that is setting Service Account by selecting “external user” option and then click on the browse to choose newly created Service account
Finally Save all

Step 7.c: Select newly created Service Account
That is select FtpUserCredentialSA.sa service account file under Resources folder
Click OK –> Save all

Step 7.d: Finally after setting Service Account for User Authentication to local FTP server in Business Service

3.5 Proxy Service :
Step 8: Create Proxy Service and add pipeline for file polling or reading
Drag and drop “FTP Transport” component from Technology palate under advanced category to Proxy Services lane
Upon dropping, a new wizard pop up to enter the required details for Proxy Service
Step 8.a: Fill up mandatory details for Proxy Service (i.e .proxy file)
- Service Name: FtpFilePollAndReadPS (append PS to the proxy service as a naming standard)
- Location: browse through “ProxyService” folder we created in earlier step
- Transport: ftp (keep it as it is)
Note: There are no other options available under Transport drop-down other than FTP Transport (ftp protocol)
Keep “Generate Pipeline” checked for creating pipeline along with Proxy Service
Click Next

Step 8.b: In step 2 of Create Proxy Service wizard –> set “Request” & “Response” Messaging type for the FTP file polling or reading service
Select Text for Request Messaging type and None for Response Messaging type
Click Next

Note: The response message type must be None because the FTP transport supports only one-way messaging
Step 8.c: In step 3 of Create Proxy Service wizard –> set Endpoint URI to local FTP server location –> from where this service going to poll or read files periodically
In this example, “ftp://localhost:21/FtpPollReadServerLocation” but it can be any valid FTP server location for FTP Transport
Click Finish

Finally Proxy Service is created for FTP file Reading/Polling
Proxy Service is created on the Proxy Services lane and this resides under “ProxyService” folder

Error: This is due to; we are yet to set couple of mandatory attribute values. Once after setting these mandatory values & saving, all errors will vanish
Let’s do that !!
Step 9.a: Double-click on “FtpFilePollAndReadPS” from Service Bus overview or else open “FtpFilePollAndReadPS.proxy” file under ProxyService folder
Go to “Transport Details” tab –> set “Download Directory*” and “Error Directory*”
- Download Directory* –> /FtpPollReadServerLocation/download
- Error Directory* –> /FtpPollReadServerLocation/error
- File Mask* –> *.txt (default value is *.* which means it can poll or read any files from “ftp://localhost:21/FtpPollReadServerLocation” location but we have restricted to poll/read only text files by setting the value to *.txt)
Optionally, we can set archive directory for file archival post reading the files but we have to make sure to select “Archive” from Post Read Option*
- Archive Directory* –> /FtpPollReadServerLocation/archive
Other attributes we can keep as it is or else fine tune depending upon the business requirement

Step 9.b: Set Service Account for FTP server User Authentication in Proxy Service
Since, Proxy Service poll or read files from FTP server –> it need to authenticate itself with FTP server before actual polling or reading from that location
Set User Authentication details that is setting Service Account by selecting “external user” option and then click on the browse to choose newly created Service account
Finally Save all
Note: This is same step as followed in the Business Service (step 7.b)

Step 9.c: Select newly created Service Account
That is select FtpUserCredentialSA.sa service account file under Resources folder
Click OK –> Save all
Note: Again this is same step as followed in the Business Service (step 7.c)
Step 9.d: Finally after setting Service Account for User Authentication to local FTP server in Proxy Service

Step 10: Double-click on the FtpFilePollAndReadPSPipeline.pipeline from Service Bus overview which opens up in a new editor with .pipeline extension (green-color round-cornered rectangle type figure in the Pipelines/Split Joins)
Opens up FtpFilePollAndReadPSPipeline.pipeline file in an editor

Opens up in a new pipeline editor

Step 11: Routing node
Drag and drop “Routing” from “Message Flow” under the category “Route”
3.6 Advantages of OSB 12c over OSB 11g :
- When we drag and drop the Routing or Routing Table node, it automatically have a Route node in place
- Whereas in 11g, we need to drag and drop Route node first before Routing or Routing Table node

Error: Red-ribbon type error mark on top-right corner is because; we haven’t set correct mandatory values for Routing node (after setting correct values & saving would vanishes all errors)
Step 11: Add business service to Routing node
- Click on Routing –> opens corresponding properties in the dialog box below
- Click browse icon next to Service* –> opens “Resource Chooser” –> select service to be routed
- Finally Click OK –> Save all

Save All –> all error will be erased. Time for testing
Step 12: Time to test !!
Testing Service Bus project –> deploying into IntegratedWeblogicServer

Step 13: Testing
This will open our traditional OSB console

Note: But we don’t need to execute, supplying any inputs for FTP server file polling/reading & writing
Just deploy the Service Bus application into IntegratedWeblogicServer and it start polling/reading the files from poll/read location periodically that is set to 1 minute (60 seconds)
We have restricted to poll/read only text files that is .txt files (Text Documents)
FTP server Poll/Read location: ftp://localhost:21/FtpPollReadServerLocation

After polling/reading, files are downloaded during file transfer in Download Directory
Download Directory: /FtpPollReadServerLocation/download

Note: Since file size of Text Document is 1 KB, processing happens in a fraction of seconds. So we can’t actually see files moved to this location. Same is not true for large size files
After processing the files in the download directory, files are permanently moved to file write location i.e.;
FTP server file writing location: ftp://localhost:21/FtpWriteServerLocation

Related Articles :
- Oracle SOA 12c – Installation steps using Single Installer
- Oracle SOA 12c – Domain creation steps
- Oracle OSB 12c – Hello World mock service with Proxy Service
- Oracle OSB 12c – Hello World service with both Business and Proxy Service
- Oracle OSB 12c – Operational Branch example
- Oracle OSB 12c – Conditional Branch example
- Oracle OSB 12c – Service Callout and Routing Table example
- Oracle OSB 12c – Java Callout and Routing Table example
- Oracle OSB 12c – File Polling/Reading and Writing using File Transport
- Oracle OSB 12c – File Polling/Reading and Writing using FTP Transport and authentication via Service Account
- Oracle WebLogic – Steps to create Connection Factory and Queue
- JMS Client – To produce and consume messages in JMS Queue
- Oracle WebLogic – Steps to create Connection Factory and Topic
References :
- http://docs.oracle.com/middleware/1213/osb/develop/osb-overview-design-jdev.htm#OSBDV2893
- http://docs.oracle.com/cd/E13159_01/osb/docs10gr3/security/transport_level.html#wp1073414
- http://docs.oracle.com/middleware/1213/osb/develop/osb-transport-poller.htm#OSBDV88381
- http://docs.oracle.com/middleware/1213/osb/develop/osb-transport-poller.htm#OSBDV89413
- http://docs.oracle.com/middleware/1213/osb/develop/osb-transport-poller.htm#OSBDV970
- http://docs.oracle.com/middleware/1213/osb/develop/osb-transport-poller.htm#OSBDV971
- http://docs.oracle.com/middleware/1213/osb/develop/osb-transport-poller.htm#OSBDV972
- http://docs.oracle.com/middleware/1213/osb/develop/osb-transport-poller.htm#OSBDV973
- http://docs.oracle.com/middleware/1213/osb/develop/osb-transport-poller.htm#OSBDV974
Happy Coding !!
Happy Learning !!